I have a 91 NA6 that I have been slowly working on upgrading / adding things to. I've been starting to look into replacement ECUs to start getting more experience with engine management and tuning. The rusEFI interested me due to it already having some success with the NA6, and the entire ECU being open source. Things seem to be pretty well organized and managed on the github from a quick look. I haven't actually made any boards with it, but I think KiCad is a good choice and I've been meaning to get more familiar with it.
Currently the engine and ECU are completely stock. Besides some maintenance things, I've done roll bar, sway bars, brakes and lines, etc. Still have some things to do such as dampers/coil overs. I'd like to swap the ECU and get it setup on the mostly stock engine (adding VTPS, WBO2, MAP, IAT, etc.) for now.
As far as the selection for the ECU it looks like there are some PNP options, with only the frankenso being available right now unless I grab the board files and get something else made (provided I can actually get all of the parts on the BOM). I'm not worried about wiring, some board assembly, or modifications if needed. It's looking like the micro is probably the most current, with some testing still being done on the Hellen version. I'm still trying to decide where to start with this.
Re: 1991 Miata
Posted: Thu May 27, 2021 12:12 pm
by AndreyB
Welcome to the forum!
I've edited your post to spell Hellen with two "L" since we love tiny details.
At this point HellenNA6 is the way to go for you in my opinion. While BeerMoney or myself can get you an https://github.com/rusefi/rusefi/wiki/Miata-NA-48-pin-board-for-MRE it looks like even rev A of HellenNA6 is a better option. I have no idea when rev B would be fabricated.
For the love of all life please do not assemble Frankenso from a kit.
Re: 1991 Miata
Posted: Thu May 27, 2021 4:13 pm
by Keith
Thanks for the correction. I wont go with the Frankenso kit then. I don't mind doing some work, but it would be nice to avoid doing the full assembly (and getting some additional features).
The HellenNA6 sounds like a good option. I may be missing some things, but it looks like it has knock detection and WBO2 without an additional controller where the MRE does not. Are there any good options for getting a HellenNA6 board currently, or would I need to grab the gerbers and the BOM and get one made?
Re: 1991 Miata
Posted: Thu May 27, 2021 6:17 pm
by BeerMoneyMotorsports
We have the RevA boards in hand. We would set it up for your specific needs like vtps and sequential fuel.
Some features are not perfect yet and we are still developing things. Im currently working on validating the accuracy of the wideband as it is extremely important to be correct.
VTPS, MAP, IAT are all fully functional. We would need to know what vtps you plan to use.
I have two cars running the ecu and it is fantastic.
Re: 1991 Miata
Posted: Thu May 27, 2021 6:53 pm
by Keith
I purchased a Kia TPS that I've seen recommended before, I don't have an adapter bracket for it yet. I can check part numbers later. As far as the O2 I understand, I should have a spartan 2 OEM soon. I was planning to wire in before I saw the hardware for the WBO2 was included so I have that option as well.
@keith , please order through the ebay link and select painted case. Then we can start our journey to glory! Well, as glorious as miatas can be. Hahah. See below for motivation
Re: 1991 Miata
Posted: Fri May 28, 2021 12:27 am
by Keith
Done!
Also, I do have some experience with electronics (EE, hardware not so much software). I've done some schematic design, but I could use a bit more experience on the layout side of things, and I regularly work with PCBs. Not sure how much additional contribution you are looking for in that area, but maybe there are some things I could help with.
Re: 1991 Miata
Posted: Fri May 28, 2021 1:41 pm
by BeerMoneyMotorsports
Your input is what we want most. More you can give, the better the product will be. See below to make sure the features are right.
Mods-
VTPS(kia)
Sequential fuel
Re: 1991 Miata
Posted: Fri May 28, 2021 2:22 pm
by Keith
It looks like the hardware side has been going well, but I figured I'd throw that out there just in case.
Going back over mods:
Currently the car is completely stock, but I have or will have some things to add.
Kia VTPS
Bosch LSU 4.9 (getting controller)
GM AIT sensor
Looks like the MAP is DNP based on the images, it's not a problem to get one and wire it in if that is still the case. I also plan on getting a knock sensor, I was looking at a Bosch one last.
Do you have any additional suggestions for things I should consider adding to this list?
Re: 1991 Miata
Posted: Sat May 29, 2021 8:00 pm
by BeerMoneyMotorsports
The ecu is coming to me 1st and i am adding the map, main connector and performing some tweaks needed on this first revision of hardware. I do recommend going sequential fuel right away. Its an easy mod and makes it run a little better. Gm iat is good to go as it is, you will just need to enter the specific sensor calibration through tech tool.
Re: 1991 Miata
Posted: Sat May 29, 2021 9:40 pm
by Keith
I'll plan on setting up the injectors for sequential fueling. It looks like it's just connecting injector 3 -> 3Y and injector 4 -> 3Z based on the available schematic/pinout.
I do recommend going sequential fuel right away. Its an easy mod and makes it run a little better. Gm iat is good to go as it is, you will just need to enter the specific sensor calibration through tech tool.
wiki?
Re: 1991 Miata
Posted: Sun Jun 06, 2021 7:34 pm
by BeerMoneyMotorsports
Going out tomorrow
Re: 1991 Miata
Posted: Mon Jun 07, 2021 2:23 pm
by Keith
Thanks for the update!
Will this require pulling the "ST SIGN" fuse under the hood like other PNP boards? I planned on pulling it for now just in case so I don't run into an issue after cranking.
Should the new TPS be plug and play after the board changes or do I need to repin anything? I can double check the pinout later and check the sensor with my DMM. I think I just need the adapter bracket know which I have a friend printing me one with ABS.
Re: 1991 Miata
Posted: Mon Jun 07, 2021 4:55 pm
by BeerMoneyMotorsports
It should not require pulling the ST sign fuse. we use a different method for fuel pump control compared to megasquirt. You will need to disconnect the stock tps sensor before connecting the ecu. It is prewired for vtps, sequential fuel and knock. ill be sending you some info on getting started.
Re: 1991 Miata
Posted: Sun Jun 13, 2021 12:31 pm
by Keith
I’ve made some progress in the past few days, so I will go over everything I did.
Injector Harness
I pulled the injector harness to set up the wiring for sequential injection. I removed the 4 bolts holding the idle air valve to make it easier to get to the connectors and pull the harness out. The coolant temp connector on the back of the motor was a pain to get disconnected so I just depinned them from the connector.
I separated injectors 3 and 4 at the crimped part of the wire, and connected them using individual wires to another 2 pin connector.
Inj Harness 2.jpg (1.21 MiB) Viewed 16845 times
MAP Sensor Hose
I added the MAP hose to the spot where the cruise control was originally connected. The cruise control didn't work properly in this car and I wouldn't use it anyway so it was already removed from the car. I routed the hose for the MAP with the other connected house.
Intake MAP.jpg (3.77 MiB) Viewed 16845 times
Wire Routing
I used the small hole in the firewall, behind the washer fluid reservoir for the MAP hose. I made an additional hole at the firewall to pull the additional wires through. 2 wires for injectors 3 and 4, 2 wires for a knock sensor, and the extension harness for the o2 sensor. The wires mostly followed the OEM harness.
Firewall.jpg (2.73 MiB) Viewed 16845 times
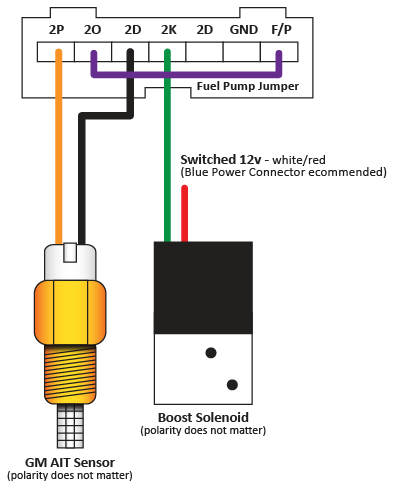
IAT Sensor and Fuel Pump Relay Jumper
To connect the IAT sensor, I purchased an extension 7 pin harness for the VAF/MAF and cut the connector off. I connected the IAT sensor to two of the wires (2P and 2D) and connected two of the other wires to jump the fuel relay connection (2O and F/P). I found the wiring and pinout here (https://trubokitty.com/assets/images/AFM_Fuel_Jumpers.png) I need to come up with a better mounting solution for the AIT, but for now it's inside the intake to get started.
IAT Harness.jpg (4.71 MiB) Viewed 16845 times
IAT.jpg (3.56 MiB) Viewed 16845 times
TPS
I removed the original 3 position TPS from the throttle body. I ended up having to separate the cover from the TPS in order to remove it from the shaft due to limited space. I had an adapter to fit a Kia TPS printed using ABS. The file can be found on Thingverse here (https://www.thingiverse.com/thing:3414132). After getting the mounting screws I put the TPS on the car. I made sure to position it so that when pulling the throttle cable through it's full range it didn't get caught up due to being at the end of the TPS' rotation.
Kia TPS + Adapter.jpg (2.57 MiB) Viewed 16845 times
TPS.jpg (4 MiB) Viewed 16845 times
O2 Sensor
For the O2 sensor controller I used a Spartan 2 OEM. I soldered wires to the PCB, added some connectors, soldered the status LED, then threw it into a project box. I swapped the OEM o2 with the LSU 4.9 sensor. I pulled power from the window switch circuit for the o2 controller so that it had an ignition controlled source.
ECU
Inside the car, the wires all were dropped down to the ECU at the passenger side of the car. The connections at the ECU were made. The ECU was already set up when I got it so no additional modifications to the ECU itself were required.
Injector 3 to pin 3Y
Injector 4 to pin 3Z
Spartan 2 Linear output to pin 3N
Spartan 2 electronics ground was connected to the ECU sensor ground wires.
ECU installed.jpg (4.27 MiB) Viewed 16845 times
Configuration
Loading up Tunerstudio, I configured the Injectors (215cc), calibrated the TPS, set the EGO configuration to 14point7, added the configuration for the IAT sensor (used GM IAT settings) and configuration for the CLT (Used RX7 settings). I grabbed those from the settings in an example project for an MS.
I did a quick check of the sensor values then started the car. It took a bit more cranking than before, but it fired up and idled. The reported AFR wasn’t quite right and the o2 status LED was just rapidly blinking signaling overheating. I need to recheck on the o2 sensor connection and verify that the wires/pins are correct on the harness. The Spartan 2 will output a 13.5 then a 16.5 AFR on startup, which I saw, so the controller seems to be powered up and connected to the ECU properly.
Next things to do:
Fix the o2 sensor measurements
Get ECU connector I’m missing to connect knock and o2 sensor
Add knock sensor wires to ECU
Fix onboard ECU wideband o2 controller
Re: 1991 Miata
Posted: Sun Jun 13, 2021 12:44 pm
by AndreyB
Thank you for the detailed write up!
Re: 1991 Miata
Posted: Sun Jun 13, 2021 12:49 pm
by BeerMoneyMotorsports
This is great! Excellent job!
Re: 1991 Miata
Posted: Wed Jun 16, 2021 12:42 pm
by Keith
It turns out I had a bad connection at the ECU connector for one of the injector wires. I reused some old harness wires with the pins already attached. When the wire moved to the right spot it worked but with some vibration or movement it disconnected. I swapped that and made sure the pinout of the o2 sensor to the controller was correct since the extension harness wasn't using the same color scheme was the sensor. It's seems to be running as expected other than the idle. When I use auto it idles high 1800+ RPM, so then I tried manual and it idles low. I set the screw at the throttle body but the idle increases at the motor gets to operating temperature. I've been trying to get that a bit more consistent.
You'll need to update firmware to take advantage of the new idle improvements, BTW.
Re: 1991 Miata
Posted: Sun Jun 20, 2021 10:36 pm
by Keith
Thanks for the information. I started over after looking though that. I am on an 06/16 build. It could still use some playing with to get the adjustments better, but in manual it seems to be okay and I can make minor changes as I go.
I added an NB knock sensor in an open threaded spot on the side of the engine. It's kind of high up and close to the front of the engine. Probably not a great spot, but I was at least able to listen to it to test it. I got the FET in to swap out for the o2 heater circuit, but I need a few things before being able to wire that up.
Re: 1991 Miata
Posted: Wed Jun 23, 2021 4:28 pm
by BeerMoneyMotorsports
Adding this to your thread for the modifications required to H64a for AC.
Remove R30 and R35. apply jumpers as shown below.
Re: 1991 Miata
Posted: Thu Jun 24, 2021 11:16 pm
by Keith
Thanks for adding that. After doing that modification the AC is now functional. Now I just need to deal with the leaks. It's old enough that it uses R12, so it'll probably get updated.
Re: 1991 Miata
Posted: Sat Jul 03, 2021 7:17 pm
by Keith
I decided to give the onboard O2 controller a try. It required wiring the sensor to the middle connector, providing 12V to the sensor, and swapping a FET on the PCB.
I've done all of that, but I have run into some issues. If I start the car the LEDs will quickly go to indicate that the sensor is overheating (4 flashes, blue LED), but if I don't start it and leave the ignition on it will heat up and act as if its functional (flashing green LED, ~29 AFR once warmed up).
I double checked the current to make sure it was heating up and I was seeing a 390Hz signal of varying duty cycle during warmup.
Re: 1991 Miata
Posted: Wed Jul 07, 2021 2:16 pm
by Simon@FutureProof
Hmm, this feels like an issue that the sensor warm up should not start until after the engine is running.
Bosch say not to heat before start on their data sheets due to moisture in the exhaust damaging sensors
Configurable heater delay after crank signal detection?
And the change in ambient conditions around the sensor is the obvious reason for the overheat,the PID is wound up and then things get hot around the sensor
MCK1117 will probably confirm
I decided to give the onboard O2 controller a try. It required wiring the sensor to the middle connector, providing 12V to the sensor, and swapping a FET on the PCB.
I've done all of that, but I have run into some issues. If I start the car the LEDs will quickly go to indicate that the sensor is overheating (4 flashes, blue LED), but if I don't start it and leave the ignition on it will heat up and act as if its functional (flashing green LED, ~29 AFR once warmed up).
I double checked the current to make sure it was heating up and I was seeing a 390Hz signal of varying duty cycle during warmup.
First, try updating the firmware on your wideband controller. Just push the "update wideband firmware" button in TS. You should see the LED blink pattern on the WBO controller change for ~5 seconds then go back to normal. I fixed a bug where induced noise from outside sources (ignition system, injectors, etc) could "trick" the controller in to thinking the sensor had overheated, so that could be what you're seeing.
If that doesn't work, set the debug mode (bottom of the base engine menu in TS) to "rusEFI wideband", then take a datalog of the (attempted) sensor warmup. That'd be super helpful to diagnose what's going on with your sensor/controller.
Lastly, what exact sensor are you using? Part number would be much appreciated.
Hmm, this feels like an issue that the sensor warm up should not start until after the engine is running.
Bosch say not to heat before start on their data sheets due to moisture in the exhaust damaging sensors
Configurable heater delay after crank signal detection?
The sensor is a Bosch 0258017025, I just pulled it to verify. It does seem to work okay with the Spartan2 so I've kept using that for now. I still have everything wired to a different connector so it's a quick swap to test. I know the ceramic can get damaged so I did try to start the car before the warm up finished initially. After I let it warm up without it running to see if there was maybe some ignition noise or something causing issues.
After I made the post I had tried to update the firmware, I had to grab a newer nightly (7/3 I think) to do it since the build I was on didn't seem to want to do it without giving an error. Is there anyway to verify its firmware version?